December Art and Soul!

If you need to knock out some inexpensive and QUICK Christmas projects... December Art and Soul is where you want to be!

We'll be offering an encore of the CREATE Christmas projects.  These are all super fast and you can get several done in a short time.  Join us December 6th from 7:30 pm until 10:00 pm at Heather's house.

This isn't a good date for many of you--but then again, it's December?  So, you can also feel free to come by and grab supplies sometime so you can complete these projects at home.


While supplies last, we'll have:
Chalkboard mugs... 2 for $5
Chalkboard placemats...2 for $5
Chalkboard signs...2 for $5
Dry Erase signs (8.5" x 11")... 2 for $5
Stamped Tile Coasters...set of 4 for $5  

Um, yes.  In a bit of a chalkboard phase here.  Crafty friends--you will not beat these prices for some awesome teachers gifts or neighbor gifts or friend gifts or whatever!  And, they are super cute, too.  

Hope to see you on December 6th!  Or let me know if you want to swing by and grab supplies for your own craft day at your convenience.     

OCTOBER ART AND SOUL

Hey there crafty friends!  

We wanted to be sure and give you the information about the October crafting opportunity.  We will not be having Art and Soul in the traditional sense, as Jessica is teaching a craft at the Holiday How To event at Compass Church in Colleyville.  

Go here for more details.

Again, this event is October 18th.

6:30 to 9:00 p.m.

At Compass Church

"Join us and receive creative holiday ideas. Choose to attend three workshops from several choices plus enjoy a light dinner, all for $5.

Class sizes are limited.

Register during weekend services on October 6/7, 13/14 or by contacting karonarita@mycompasschurch.com."


Whether or not you've ever been to Art and Soul, hope you can join this great crafting and Girls Night Out opportunity!   


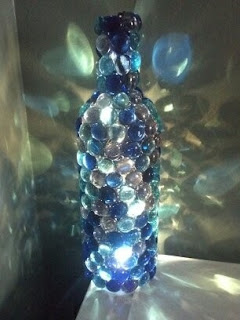
September Art and Soul: Recylcled Bottle Night Ligh

Hello there Art and Soul Crafters!  Y'all did a great job on these recycled bottle night lights at our September Art and Soul.  

We're posting the instructions for any of you who couldn't make or want to make another one.


Supplies:
--bottle (wine bottle, olive oil bottle, bottle purchased at Hobby Lobby--clear or green are fine)

--E6000 glue (Hobby Lobby or Walmart)

--flat bottom glass floral marbles/beads (Dollar Tree or craft store)--color of your choosing!

--OPTIONAL:  the cork to the bottle (or buy corks at craft store)
 
--strand of mini Christmas lights

Instructions
1. Take the label off the bottle if you want.  It's suggested if the label is large or dark in color.

2.  Work outside if possible or a well ventilated area.  The glue is potent in smell!
 
3.  Because both the glass and the marbles are slick, here is the suggested method for adhering the marbles to the bottle.  Put a bead of E6000 on the bottom of the marble and sit it to the side to dry a little bit.  Do several at a time, perhaps placing on a paper plate as you work.  Then, put beads of E6000 on the bottle.  Once the E6000 is a little tacky on both surfaces, place your marbles on the bottle.  You will likely have to hold each marble in place for a few seconds to help it set before you move to the next one.

3.  The marbles may want to slide right off the bottle--so be patient!  Allowing the glue get a bit tacky helps this--as does having the glue on both the marble and the bottle.  Another optional tip is to use masking tape to hold the marbles in place once you have a row of them down.  You can take the masking tape off the next day.  

4.  Work in small sections of a time.  Seems to help to let the bottle rest on its side rather than upright as you work.  You may wish to make a pattern with your marble colors--but randomly placing them is just as pretty and of course, faster.  

5.  Once you have covered the bottle in the marbles, set it aside to dry overnightAgain, wrap masking tape all around the bottle to help the marbles set IF you want!  

6.  Optional:  take the cork and glue a marble to the top.  Your bottle does not have to have this finishing touch, though.

7.  Take a small strand of white lights and shove them down into the bottle.  Leave enough cord hanging out the back of the bottle to plug in wherever you intend to use your night light.

All of these projects were so gorgeous in the light they gave off--a real stained glass sort of effect.  This can be a tedious project to complete, but SO worth it.  One of our crafters decided to leave the blank space at the top of her bottle to switch out a seasonal bow.  Make it your own!  And happy crafting!